» navigation
» introduction
Photography is my #1 'hobby'. I dabble in all forms of photography from analog to digital. I've also experimented with lomography, high-speed, and high dynamic range imaging. The below is a bit out of date, but I hope to update it shortly!
» my camera
I became interested in photography at an early age, but never really took the time to get into it. I took the plunge in 2002 after defending my Master's thesis when my parents offered to "buy me something." That something was my Canon G3. I researched for weeks trying to decide on the best camera for me until settling on the G3. I wanted something with the ease of a point and click, but also with the option for manual control. The G3 fit my needs; it offers the user complete control of shutter speed, aperture, exposure, etc. I've quite enjoyed this camera through the years. I've still yet to fully appreciate all of it's features, but I'm learning! I've made a page with various tips and tricks for the Canon G3 that I've come across. You can find that page here. Also find a quick-reference dictionary of photography terminology here.
» macros
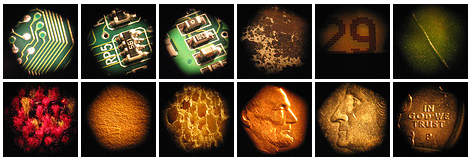
I'm fascinated with "extreme close-up" shots. My very first attempt at such shots was to use the built-in macro mode. Results were pretty unsatisfactory. Eventually, I discovered Lensmate's website. They offer lens adapters for a variety of cameras and with the adapter one can attach various lens filters. My first lens filter purchase was a Hoya macro set (+4, +2, and +1). Results were decent, but I needed to get closer!
Through some research with google searches and Canon G3 forums, I found an interesting technique that works by reverse mounting a camera lens to gain magnification. I purchased an adapter and macro coupling ring from Lensmate and a cheap 52mm Nikon lens off of eBay. Results are quite cool (see below). With this lens I need to be very close to the object being photographed. Pictures also end up with a circular black frame. A better lens (and other factors) will result in truly spectacular photographs. Check out this webpage to truly appreciate what can be accomplished with lens reversing.
» through the viewfinder
Through the viewfinder (TtV) is a photography technique that utilizes a digital camera and old box camera. The goal of TtV is to take a photo with the digital camera through the viewfinder of the box camera. The resulting photo will have an authentic and vintage appearance. Results will depend on the condition and type of box camera used. It's not uncommon for TtV photos to have dust and scratch artifacts, vignetting, low depth of field, etc.
To produce high-quality TtV photos a contraption needs to be built to block light from the viewfinder of the old camera. There are many ways to build such a contraption. Russ Morris, aka rustman, has a nice step-by-step tutorial for his contraption available on his website. He also has plans for his version 2 contraption available for download here [mirror]. There is also a thread in the flickr ttv group with pictures of contraptions that other people have come up with.
[quick links]» hdr imaging
Digital cameras are limited by their sensors in that they can only capture a narrow range of intensity values in the scene. For example, if you focus on a mid-intensity object the bright sky will be very bright and the shadows will be very dark. High Dynamic Range (HDR) imaging (HDRI) is a photography technique that attempts to capture a greater intensity range than what current digital cameras allow.
Their are at least 2 different techniques of HDRI, but they both require high-quality photographs to be taken, preferably in RAW format. The first one requires the photographer to take 3 or more photographs of the scene at different exposures. These photographs are then composed into a single HDR image that can then be tonemapped (converting the HDR images to images that can be viewed on computer monitors). The second technique requires only one photograph to be captured at an average expsure prior to tonemapping. HDR images look fantastic. Depending on how the images were tonemapped, they can make an otherwise boring picture look vibrant or even surreal.
To create HDR images software for handling high-resolution images and tonemapping are needed. Photoshop CS2 and CS3, and Photomatix are the more popular commercially available software packages. There are some free packages available. I've only tried FDRTools and qtpfsgui and they seem to work reasonably well. Check out the below websites for other software packages and more information on HDRI.
[quick links]
» pinhole photography (with a digital camera)
I think we all know what a pinhole camera is. There are companies around that still make the old-fashioned version, but there are also methods available to make a "digital pinhole camera." Read more about the subject at the websites listed below.
[quick links]
» orton imagery (orton effect)
Once upon a time there was a photographer named Michael Orton. He developed a photography technique that resulted in photos that are kind of fantasy-like and surreal. This technique is now called Orton imagery or the Orton effect. Just check out the quick links for pictoral examples, a better explanation, and the film and digital method (included below quick links for my convenience) for accomplishing this technique. Have fun!
[quick links]
[orton effect with digital photography]
These instructions found on this site
- Open any image you wish to try the technique on. Make a duplicate of the image (Image>Duplicate). Close the original image.
- Lighten the image as follows: Image>Apply Image then in the dialog box that comes up change the bending mode to Screen and the Opacity to 100%. This will give you an appropriately overexposed image.
- Duplicate this overexposed image (Image>Duplicate).
- Blur this second image (Filter>Blur>Gaussian Blur and in the dialog box use a Radius setting of 15 to 50 pixels the higher the pixel setting the blurrier the photo and the more painterly the image but you can go too far!). Experiment with different settings, for my tastes and for the size of my digital files (50-100 megabytes) a radius of about 25 pixels works perfect.
- Now select the move tool from the Photoshop tool bar (or just press v on your keyboard for quicker access to the move tool). Hold down the shift key and use your mouse to drag and drop the blurry image onto the sharp one (dont let go of the shift key until after you release the mouse button or the images wont be in perfect alignment).
- Bring up the layers palette in Photoshop (F7 is the keyboard shortcut). Under the word Layers in the layers palette will be a menu box of blending modes. Change the blending mode from normal to multiply.
- Now flatten the two layers by pressing CTRL+E or by clicking on the sideways triangle in the layers palette to select flatten image.
» oob processing
OOB is an acronym that stands for Out of Bounds. It's a processing technique that gives photographs a 3D illusion. The technique involves creating a frame and masking out objects of interest to overlap the frame. The addition of shadows enhances the illusion and really grabs you without 3D glasses! I like to call the process of converting a photo to an OOB OOBerizing and refer to photos that have been OOBerized as being in OOBervision. Please see the below links to learn more about the the OOB processing technique.
[quick links]